Customer service is at the forefront of modern business success, and having the right tools is essential for delivering exceptional experiences. Salesforce’s Omni-Channel feature is a game-changer for routing and managing work efficiently, enhancing productivity, and ensuring consistency across all channels. This blog will explore what Omni-Channel is, why it’s vital, when to use it, who can access it, and how to implement it, with a special look at the types of routing methods available.

What is Omni-Channel in Salesforce?
Omni-Channel is an intelligent work routing tool in Salesforce designed to assign work items (such as cases, leads, and chat requests) to the most qualified and available agents. It automates task distribution based on criteria like agent availability and skill sets, optimizing resource allocation and maintaining service quality.
Types of Routing in Omni-Channel
Omni-Channel supports different routing methods tailored to various business needs:
- Queue-Based Routing
- How It Works: Agents are assigned to queues that represent specific skills or categories. Omni-Channel assigns work items to these queues and pushes them to available agents within the queue.
- Best Use Case: Ideal for smaller organizations that support a limited number of products.
- Skills-Based Routing
- How It Works: Agents are assigned particular skills, and work items are tagged with the required skills. Omni-Channel matches tasks to agents possessing the exact skill set needed for each item.
- Best Use Case: Perfect for larger organizations with numerous agents supporting a variety of products, complex skill sets, or customers across different languages and regions.
- External Routing
- How It Works: Integrates a third-party routing solution with Salesforce through APIs, allowing external systems to route work items to agents in the Salesforce Service Console.
- Best Use Case: Suitable for organizations wanting to maintain an existing routing system while using Salesforce as their service interface.
Why is Omni-Channel Essential?
1. Enhanced Efficiency
Omni-Channel automates task assignment, ensuring work reaches the most suitable agent in real-time, reducing manual intervention, and improving response times.
2. Better Agent Productivity
By monitoring and managing agent capacity, Omni-Channel prevents overload and helps agents focus on high-quality work without the risk of burnout.
3. Improved Customer Experience
Routing tasks to agents with the right skills leads to faster, more personalized service, boosting customer satisfaction and loyalty.
4. Consistent Service Quality
Regardless of how customers engage—via phone, chat, or email—Omni-Channel provides consistent service, reinforcing your brand’s reliability.
When Should You Use Omni-Channel?
Omni-Channel is essential when:
- Your customer service team manages high volumes of tasks and needs automation for efficient distribution.
- You provide support through multiple channels and need a unified system for task management.
- You aim to enhance SLAs by quickly routing priority items.
- You want to match complex customer requests with specialized agent skills using skills-based routing.
Best Routing Method Depending on Use Case:
- Queue-Based Routing: Use when your organization handles fewer products and has straightforward support needs.
- Skills-Based Routing: Ideal for complex service operations where matching tasks with highly skilled agents is crucial.
- External Routing: Best for organizations that require integration with third-party systems but want to continue leveraging Salesforce as their primary service platform.
Who Can Access Omni-Channel?
Omni-Channel is available to:
- Salesforce Service Cloud Users: Fully integrated into the Service Cloud, it’s essential for customer service operations.
- Designated Agents and Teams: Configurable for specific users or groups by administrators.
- Organizations of All Sizes: Whether you’re managing a small support team or a large-scale operation, Omni-Channel can be tailored to fit your requirements.
How to Implement Omni-Channel in Salesforce
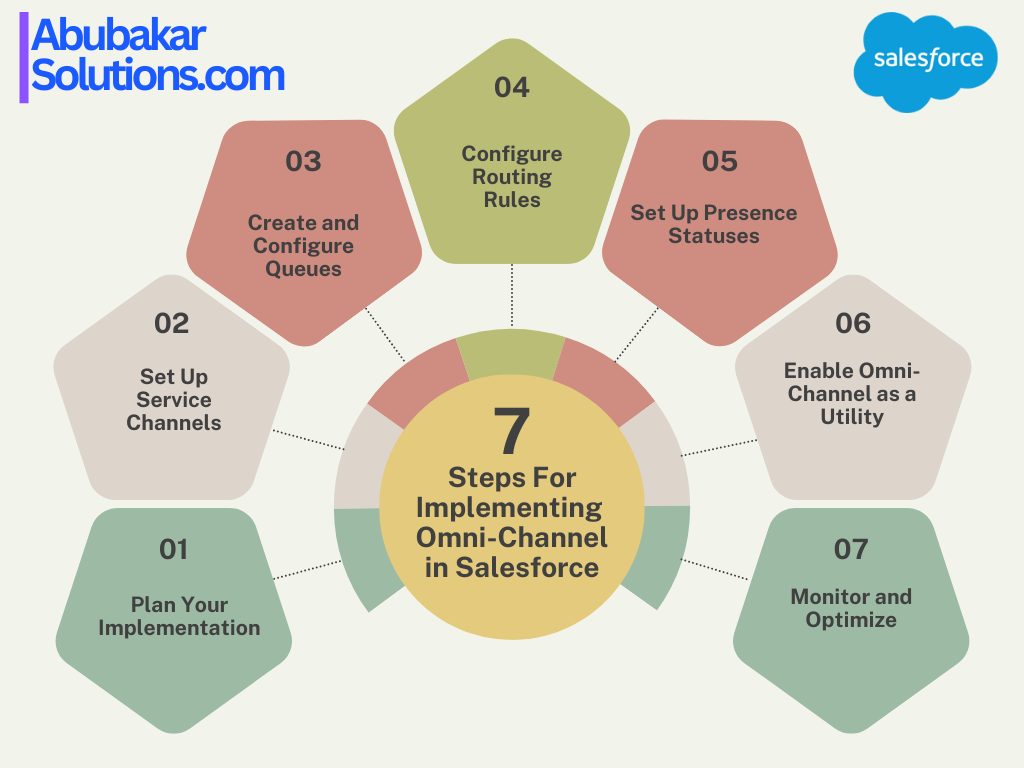
Queue-Based Routing Setup
Step 1: Enable Omni-Channel
- Log in to Salesforce.
- Navigate to Setup.
- Enter Omni-Channel Settings in the Quick Find box.
- Select Omni-Channel Settings.
- Check Enable Omni-Channel.
- Click Save.
Step 2: Create a Queue
- Access Service Console.
- From the App Launcher, find and select Service Console.
- Go to Service Setup.
- Click the gear icon in the upper right corner.
- Click Service Setup.
- Start Omni-Channel Setup.
- In Recommended Setup, click View All.
- Scroll to select Omni-Channel Setup or enter Omni-Channel in the Quick Find box.
- Click Start.
- Create a Queue:
- For Queue Name, enter High-Priority Cases.
- For Name These Agents, enter a name for the permission set (e.g., Tier1 Agents).
- Add agents to the queue by clicking the + sign next to an agent’s name or searching for the agent. Ensure to add yourself to the list.
- Click Next.
- Set Routing Configuration:
- If prompted with the Prioritize work for your agents screen, set the priority to 1 and click Next.
- Note: If this screen doesn’t appear, a routing configuration will be created automatically for you.
- Adjust Agents’ Workload:
- In Work Item Size, set the amount of an agent’s capacity that one work item consumes (e.g., enter 5).
- In Agent Capacity, set the agent’s total capacity (e.g., enter 20).
- Click Next and then Finish.
Step 3: Link Your Routing Configuration to the Queue
- Navigate to Setup > Users > Queues.
- Edit the High-Priority Cases queue:
- Under Supported Objects, add Case.
- Include all internal users in Queue Members.
- Click Save.
Step 4: Enable Presence Status for Profiles
- Go to Setup > Users > Profiles.
- Select the desired profile (e.g., System Administrator).
- Edit Enabled Service Presence Status Access:
- Add Available – Case to Enabled Service Presence Statuses.
- Click Save and repeat for other profiles as needed.
Step 5: Add the Omni-Channel Widget
- Access App Manager in Setup.
- Edit your app and add the Omni-Channel utility item.
- Configure navigation items and assign profiles.
- Save your changes.
Step 6: Test Your Setup
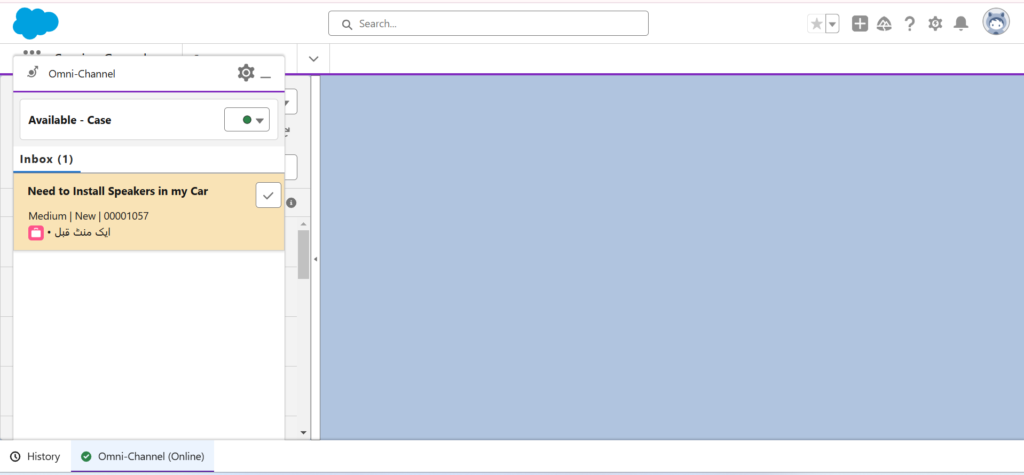
- Create a New Case and assign it to High-Priority Cases.
- Verify that the case appears in the Omni-Channel utility.
- Test the workflow to ensure agents can pick up the case.
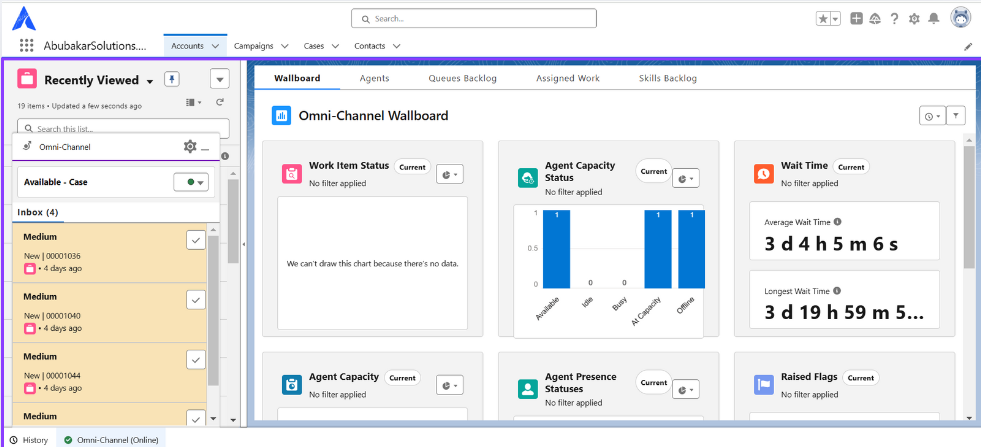
Skills-Based Routing Setup
Step 1: Enable Skills-Based Routing
- Log in to Salesforce.
- Navigate to Setup.
- Enter Omni-Channel in the Quick Find box and select Omni-Channel Settings.
- Check the boxes to Enable Skills-Based and Direct-to-Agent Routing.
- Click Save.
Step 2: Enable Field Service
- Search for Field Service Settings.
- Enter Field Service Settings in the Quick Find box and select it.
- Enable Field Service and click Save.
Step 3: Create Skills
- Define Skills.
- In Setup, enter Omni-Channel in the Quick Find box and select Skills.
- Click New to create skills like Installation and Performance.
- Optionally, add descriptions for each skill, then click Save.
- Repeat this process for additional skills as needed.
Step 4: Add Skills to Service Resource Layout
- Edit the Service Resource Layout.
- Click Object Manager in Service Setup.
- Enter Service Resource in the Quick Find box and select it.
- Click Page Layouts and then select Service Resource Layout.
- Drag Service Resource Skills onto the page layout if it’s not already there.
- Click Save.
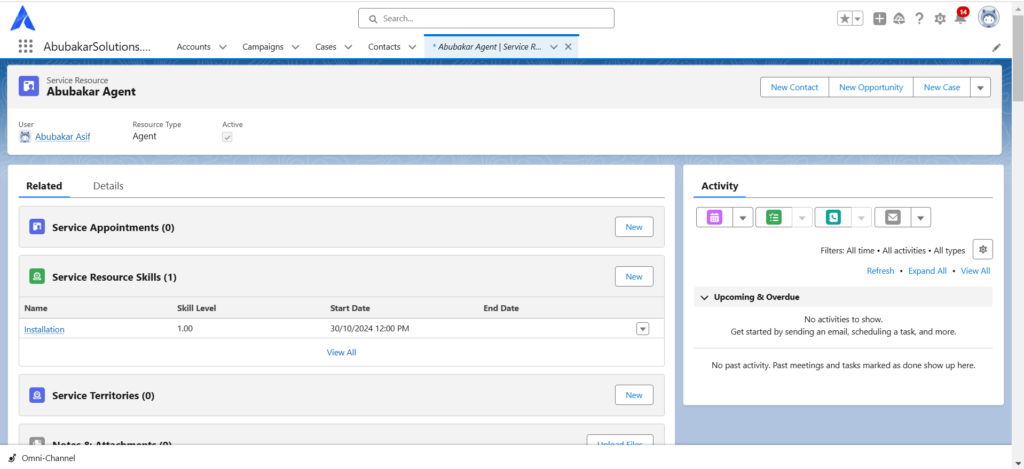
Step 5: Create Service Resources for Agents
- Add Service Resources.
- From the App Launcher, select Service Resources.
- Click New and enter the agent’s name (e.g., Abubakar).
- Check the Active checkbox to ensure the agent can receive work items.
- Select the agent under User, set Resource Type to Agent, and click Save.
Step 6: Assign Skills to Agents
- Assign Skills.
- From the App Launcher, select Service Resources.
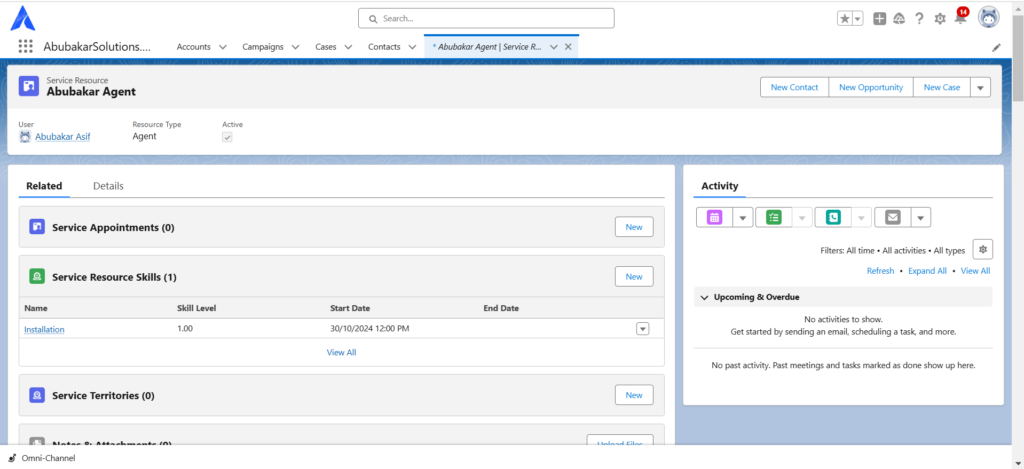
- Click on the service resource for the agent (e.g., Abubakar).
- Go to the Related tab, scroll to Service Resource Skills, and click New.
- Select a skill (e.g., Installation), optionally enter a skill level (1-10), and set start/end dates if needed.
- Click Save.
Step 7: Define Skills-Based Routing Rules
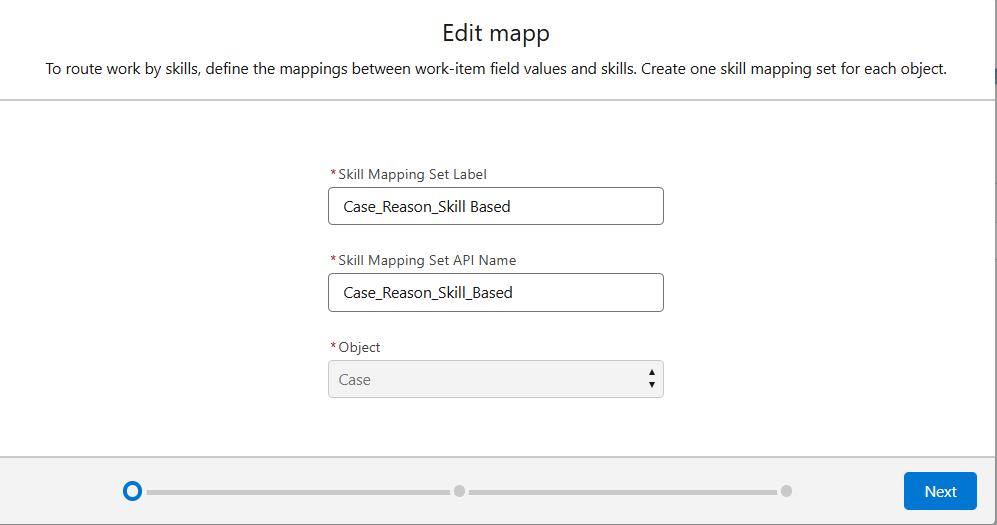
- Create Skill Mapping Sets.
- In Setup, enter Skills-Based Routing Rules in the Quick Find box and select it.
- Click New Skill Mapping Set.
- Provide a name (e.g., Case Reason Routing), developer name, and select Case as the object type to be routed.
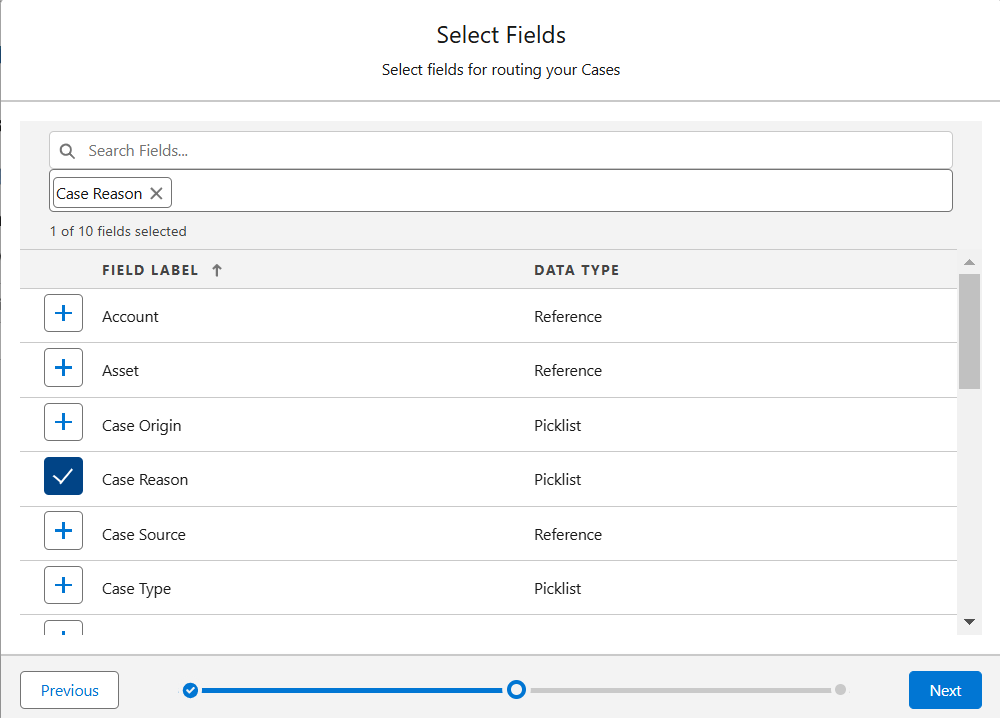
- Choose the Case Reason field for routing.
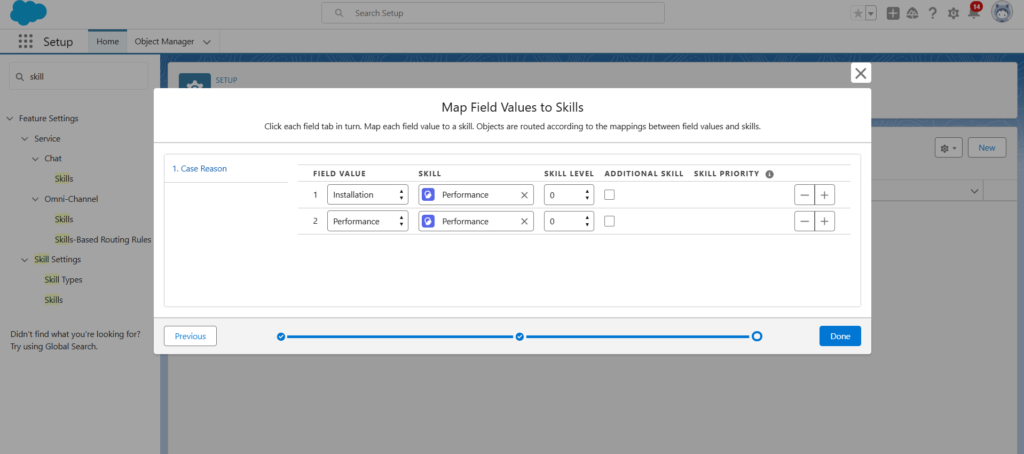
- For each case reason (e.g., Installation), map it to the corresponding skill (e.g., Installation skill).
- For Performance, map it to the Performance skill.
- Click Done when finished.
Step 8: Enable Skills-Based Routing in Routing Configuration
- Locate Routing Configuration.
- From Setup, enter Queues in the Quick Find box and select Queues.
- Edit the relevant queue and note the routing configuration name in the Configuration with Omni-Channel Routing section.
- Click Cancel.
- Enable Skills-Based Routing.
- Enter Routing in the Quick Find box and select Routing Configurations.
- Edit the routing configuration associated with the queue.
- Check the option Use with Skills-Based Routing Rules and click Save.
Step 9: Create a Case and Route It
- Create a New Case.
- From the App Launcher, select Cases.
- Click New to create a new case.
- Fill in the case details, and under Case Reason, select Installation.
- Click Save.
- Routing the Case.
- Once the case is saved, Omni-Channel will evaluate the case reason.
- Since the case reason is Installation, it will be routed to the agent (Abubakar) who possesses the Installation skill.
- Abubakar will receive the case, ensuring that it is handled by the most qualified agent.
Final Thoughts
Salesforce’s Omni-Channel helps businesses optimize work distribution, enhance productivity, and maintain consistent service levels. By understanding what, why, when, who, and how to implement Omni-Channel and choosing the right routing method, your organization can harness its full potential. Implement Omni-Channel to streamline your operations and offer your customers an exceptional support experience.
- All
- Blogs
- Implementations
- Solutions
- Back
- Certifications
- Artificial Intellegence
- Development
- Success Stories
- Tips & Tricks
- Release Updates
- One Minute Tips
- Data Science
In today’s fast-paced digital landscape, the ability to meet users and customers wherever they are, with intelligent and instant support,…

Batch Apex is a cornerstone of Salesforce development, enabling developers to process large volumes of data asynchronously while adhering to…

Why You Need to Read This Completely If you’re working with Salesforce Data Cloud or planning to leverage it, this…

In today’s data-driven world, organizations are leveraging powerful analytics tools like Tableau to make informed workforce decisions. HR teams can…

Introduction Salesforce Prompt Templates offer a powerful way to generate dynamic content for various use cases, including Agent Assistance, Email…

In today’s fast-paced development environment, continuous integration and continuous deployment (CI/CD) have become essential for delivering high-quality Salesforce applications efficiently.…
Problem Statement ABC Insurance Co. faces significant challenges in delivering personalized insurance solutions despite having a large and growing client…

Introduction Handling errors properly is crucial for building robust and reliable applications. Many developers know how to throw exceptions, but…

Introduction In today’s fast-paced digital landscape, businesses generate massive amounts of data from various sources. To make the most of…


